Introduction to Kali Linux
Kali Linux is a powerful and versatile operating system designed for digital forensics, penetration testing, and ethical hacking. With its extensive collection of tools and utilities, Kali Linux empowers security professionals and enthusiasts to assess and secure computer systems against potential vulnerabilities. In this guide, we'll explore how to install Kali Linux as a portable live USB, allowing you to perform penetration testing and hacking on any computer with ease.
Preparing Your USB Drive
Choosing the Right USB Drive
Before you begin, select a high-quality USB drive with sufficient storage capacity to accommodate the Kali Linux image. Ensure that the drive is formatted properly and free from any existing data to avoid potential conflicts during the installation process.
You'll need a USB flash disk to follow along. For basic use, you could get away with using one as small as 4 GB, or 8 GB if you want persistence. However, a larger one might be useful, particularly if you want to be able to save data. Generally speaking,4 GB USB sticks are only available at USB 2.0 speeds unless you want to shell out a ridiculous sum of money for a 256-bit encrypted Kingston IronKey or iStorage datAshur Pro.
Centon DataStick Pro 8 GB USB 3.0 (5-PK) - Up to 80 MB/s
SanDisk Ultra Fit 16 GB USB 3.1 - Up to 130 MB/s
Samsung FIT Plus 32 GB USB 3.1 - Up to 200 MB/s
Samsung FIT Plus 64 GB USB 3.1 - Up to 300 MB/s
Samsung FIT Plus 128 GB USB 3.1 - Up to 400 MB/s
Samsung FIT Plus 256 GB USB 3.1 - Up to 400 MB/s
The Kali Live ISO file and an image tool, such as Etcher or Rufus, which we describe below, are also required.
Downloading the Kali Linux Image
Obtaining the Latest Version of Kali Linux
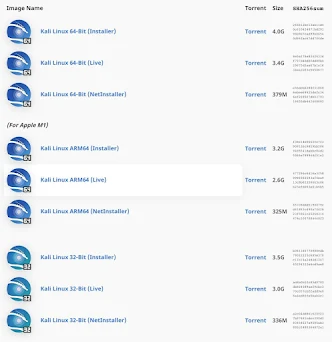
Visit the official Kali Linux website to download the latest version of the operating system. Select the appropriate image for your system architecture (32-bit or 64-bit) and download the ISO file to your computer. Go to kali.org/downloads and get the relevant Live image.

Creating a Bootable USB Drive
Using Rufus (Windows) or Etcher (Mac/Linux)
To create a bootable Kali Linux USB drive, you'll need to use a tool such as Rufus (for Windows) or Etcher (for Mac/Linux). Insert your USB drive into your computer and launch the selected tool. Follow the on-screen instructions to select the Kali Linux ISO file and create the bootable USB drive.
Use a USB formatting tool to install
You could copy the Kali Live image to a USB drive on Linux and macOS machines using the dd command, but there's always a chance you won't choose the right disk and you'll screw yourself over severely by overwriting a crucial drive. We advise utilizing a USB formatting tool as a result. Rufus is a useful tool if you're on Windows, but we're using Etcher because it's compatible on Linux, macOS, and Windows.Go to balena.io/etcher and click the "Download" button; the program should recognize your system and provide the appropriate version. If not, select your OS by clicking the drop-down menu next to it. Install it as you would any other program after it has been downloaded. On macOS, for instance, open the DMG, drag balenaEtcher into the Applications folder, and then eject and remove the DMG.
Use the flash drive to flash the Kali Live Image.
To select an image, open Etcher and select it. Instead, you might see options for "Flash from file" and "Flash from URL"; if so, select "Flash from file."
Locate and pick the Kali image that you downloaded in the first step. Next, you must select your USB flash drive by clicking "Select Target". Examine the drive name and available space to make sure you're choosing the correct drive two, three times.
The only thing left to do is select "Flash!" Your flash drive will be reformatted in this way, erasing everything and replacing it with the Kali Live image.
To allow Etcher to work its magic, you might be prompted to enter your admin password. If that is the case, please enter it. After that, Etcher will display a progress bar that shows how much longer the content needs to flash. When it's finished, a "Flash Complete" notice will appear.
Booting into Kali Linux
Accessing the Boot Menu
Once you've created the bootable USB drive, insert it into the computer where you want to run Kali Linux. Restart the computer and access the boot menu by pressing the designated key during startup (typically F12 or Esc). Select the option to boot from the USB drive.
Running Kali Linux Live
Exploring the Live Environment
After booting from the USB drive, you'll be presented with the Kali Linux live environment. From here, you can explore the various tools and utilities included in the operating system, perform penetration tests, and conduct security assessments on the target system.
Installing Kali Linux (Optional)
Performing a Full Installation
If you wish to install Kali Linux permanently on your computer, you can do so from the live environment. Launch the installer and follow the on-screen prompts to complete the installation process. Be sure to allocate sufficient disk space and configure the installation options according to your preferences. Go to kali.org/downloads and get the relevant Live image.
Tips and Tricks for Pen-Testing & Hacking
Maximizing Your Efficiency and Effectiveness
- Familiarize yourself with the various tools and utilities included in Kali Linux.
- Keep your tools updated regularly to ensure compatibility and effectiveness.
- Practice responsible and ethical hacking practices at all times.
- Join online communities and forums to learn from experienced professionals and share knowledge with peers.
- Continuously expand your skillset and stay informed about the latest developments in cybersecurity.
Conclusion
By installing Kali Linux as a portable live USB, you gain the ability to perform penetration testing and hacking on any computer, anytime, anywhere. With its extensive toolkit and user-friendly interface, Kali Linux is an invaluable asset for security professionals, enthusiasts, and ethical hackers alike.


.jpg)
.jpg)
.jpg)
.jpg)


.jpeg)


0 Comments